This was the largest element of
the whole project, and the one which would require the most care and thought; screw any of this up and I may be starting over.
Having chosen Ash, I had to contend with how dense and heavy this hardwood is. It proved difficult to drill through and cut. Proper tools and fresh implements do make a difference, however, and there are generally several ways around every problem. I had to decide whether I was making an investment in new power tools or making do with what I had on hand.
A friend taught me long ago that if you find yourself in need of a tool (the right or only tool for a specific job), go ahead and buy that tool - you will more than likely need to use it again, And, you save yourself the frustration of using the wrong tool or doing the job the hard way. Alas, I never really learned my lessons except 'the hard way'. And with bloody knuckles. So a table saw, band saw, belt sander and drill press were out (oooh, I want one). I did pick up a cheap 4" jigsaw which came in very handy - actually could not have cut out the body without it.
So, on to the process.
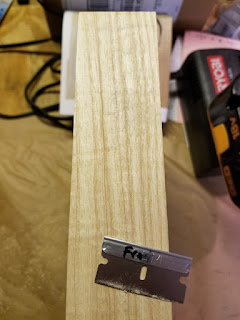
The plank I chose was just under 9" wide. Having no jointer or planer power tools/table, I resolved to ask at Dixieline Lumber for their help (there's a guy on YouTube who had done this entire process with hand saws and hand planers - ugh!). It was $12 to cut and plane the ash and it was done quicker than it took me to bring my car around to the back lot. So with two pieces now I had about 5" of play to align the grain on the two halves in the most appealing way before gluing them together. Following internet advice I fashion a fine micro-planer from a fresh razor blade. This allows the finest shavings to be removed from a planed surface to create a Slightly concave surface that allows enough glue to bond without it all squishing out the sides. I did later confirm that the bond I achieved was so strong that I could not snap or break a scrap piece at the joint. Three 18" clamps worked well to firmly hold the blank while the glue was given 24 hours to cure (below). I also used two small clamps at either end of the joint to ensure the pieces were flush to each other.
 |
| Yup, planed surfaces perfectly flat to one another |
 |
| Well, this is not flat! Without a planer, this took some time to level |
 |
| Sanding the edge of a fresh razor blade makes a great micro planer |
Clamping of the two planed planks proved relatively easy, and allowing 24 hours for the glue to cure resulted in an impressive bond.
With the blank prepared, my plywood template needed to be firmly affixed to the wood blank. Others had used double-sided tape, although I did not find this to work as well as I'd hoped. Thus I got on mostly with strategically placed clamps while supporting the body blank on a few 2x4's.
 |
| Rough (very!) cut after jigsaw |
 |
| Clean body cut after router |


Comments
Post a Comment